Prometheus and Grafana

바이프로스트 노드 및 릴레이어는 시스템 메트릭 모니터링도 지원합니다. 이 가이드는 노드와 릴레이어를 모니터링하기 위해 PrometheusGrafana를 설정하는 방법을 안내합니다.

Prometheus 활성화

바이프로스트 노드와 릴레이어가 Prometheus 메트릭을 수집하려면, 해당 기능을 수동으로 활성화해야 합니다.

노드의 Prometheus 서버를 활성화하려면, 다음 CLI 플래그를 설정한 후 노드를 재시작해야 합니다.

  • --prometheus-external : Prometheus 익스포터를 모든 인터페이스에서 접근 가능하도록 노출합니다.

  • --prometheus-port <PORT> : 기본 포트는 9615로 설정됩니다. 다른 포트를 사용할 경우 이 플래그로 지정해야 합니다.

만약 풀노드를 운영 중이라면, 릴레이어의 Prometheus 서버를 활성화하기 위해 구성 파일 (YAML)의 아래 설정을 수정한 후 릴레이어를 재시작해야 합니다.

prometheus_config:
  is_enabled: true
  is_external: true
  port: 8000

정상적으로 재시작되었다면, 두 서비스 (노드와 릴레이어) 모두 초기 실행 시 아래와 같은 로그가 출력됩니다.

2023-07-14 18:24:54 〽️ Prometheus exporter started at 0.0.0.0:9615

Systemd 사용하기

이 섹션에서는 Systemd를 이용해 Prometheus와 Grafana를 설치하고 설정하는 방법을 설명합니다.

Prometheus 설치

먼저, 설정 파일과 실행 파일을 저장할 디렉터리를 생성합니다.

sudo mkdir /etc/prometheus
sudo mkdir /var/lib/prometheus

그런 다음, 운영 체제를 업데이트하고 최신 Prometheus를 설치합니다. 최신 릴리스는 GitHub 저장소의 Releases 페이지에서 확인할 수 있습니다.

sudo apt-get update && apt-get upgrade
wget https://github.com/prometheus/prometheus/releases/download/v2.45.0/prometheus-2.45.0.linux-amd64.tar.gz
tar xfz prometheus-*.tar.gz
cd prometheus-2.45.0.linux-amd64

실행 파일을 /usr/local/bin/ 디렉터리로 복사합니다.

sudo cp ./prometheus /usr/local/bin/
sudo cp ./promtool /usr/local/bin/

콘솔 파일을 /etc/prometheus 디렉터리로 복사합니다.

sudo cp -r ./consoles /etc/prometheus
sudo cp -r ./console_libraries /etc/prometheus

모든 작업이 완료되면 prometheus 디렉터리를 삭제합니다.

cd .. && rm -rf prometheus*

NodeExporter 설치

이제 NodeExporter를 설치합니다. 최신 릴리스는 GitHub 저장소의 releases 페이지에서 확인할 수 있습니다.

wget https://github.com/prometheus/node_exporter/releases/download/v1.6.0/node_exporter-1.6.0.linux-amd64.tar.gz
tar xvf node_exporter-*.tar.gz
sudo cp ./node_exporter-*.linux-amd64/node_exporter /usr/local/bin/
rm -rf ./node_exporter*

AlertManager 설치

먼저, 구성 파일과 실행 파일을 저장할 디렉터리를 생성합니다.

sudo mkdir /etc/alertmanager

다음으로, AlertManager를 설치합니다. 최신 릴리스는 GitHub 저장소의 releases 페이지에서 확인할 수 있습니다.

wget https://github.com/prometheus/alertmanager/releases/download/v0.25.0/alertmanager-0.25.0.linux-amd64.tar.gz
tar xvf alertmanager-*.tar.gz
sudo cp ./alertmanager-*.linux-amd64/alertmanager /usr/local/bin/
sudo cp ./alertmanager-*.linux-amd64/amtool /usr/local/bin/
rm -rf ./alertmanager*

Grafana에서 필요한 AlertManager 플러그인도 설치합니다.

sudo grafana-cli plugins install camptocamp-prometheus-alertmanager-datasource

Alert Rules 설정

먼저, AlertManager의 규칙을 정의하는 rules.yml 파일을 생성합니다.

sudo vi /etc/prometheus/rules.yml

다음은 인스턴스가 다운되었거나 CPU 사용률이 80%를 초과할 경우 경고를 발생시키는 두 개의 기본 규칙을 생성하는 예시입니다. 아래 내용을 추가하고 파일을 저장합니다.

groups:
  - name: alert_rules
    rules:
      - alert: InstanceDown
        expr: up == 0
        for: 5m
        labels:
          severity: critical
        annotations:
          summary: "Instance $labels.instance down"
          description: "[{{ $labels.instance }}] of job [{{ $labels.job }}] has been down for more than 1 minute."

      - alert: HostHighCpuLoad
        expr: 100 - (avg by(instance)(rate(node_cpu_seconds_total{mode="idle"}[2m])) * 100) > 80
        for: 0m
        labels:
          severity: warning
        annotations:
          summary: Host high CPU load (instance bLd Kusama)
          description: "CPU load is > 80%\n  VALUE = {{ $value }}\n  LABELS: {{ $labels }}"

alertmanager.yml 파일은 경고가 발생했을 때 호출할 외부 서비스를 설정하는 데 사용됩니다. 여기에서는 Gmail 알림을 사용할 예정입니다.

Gmail 알림을 사용하려면 앱 비밀번호(app password)를 생성해야 하며, 알림 전용 이메일 주소를 사용하는 것을 권장합니다. 설정 방법은 이 링크를 참조 바랍니다.

그리고 아래와 같이 Gmail 설정을 추가한 뒤 파일을 저장합니다.

sudo vi /etc/alertmanager/alertmanager.yml

Gmail 설정을 추가하고 아래와 같이 파일을 저장합니다.

global:
  resolve_timeout: 1m

route:
  receiver: 'gmail-notifications'

receivers:
  - name: 'gmail-notifications'
    email_configs:
      - to: '' # receiver email
        from: '' # sender(monitoring system) gmail
        smarthost: 'smtp.gmail.com:587'
        auth_username: '' # sender(monitoring system) gmail
        auth_identity: '' # sender(monitoring system) gmail
        auth_password: '' # sender(monitoring system) gmail's app password <https://support.google.com/mail/answer/185833?hl=en>
        send_resolved: true
Example
global:
  resolve_timeout: 1m

route:
  receiver: 'gmail-notifications'

receivers:
  - name: 'gmail-notifications'
    email_configs:
      - to: '[email protected]'
        from: '[email protected]'
        smarthost: 'smtp.gmail.com:587'
        auth_username: '[email protected]'
        auth_identity: '[email protected]'
        auth_password: 'my-auth-password'
        send_resolved: true

Prometheus 설정

Prometheus를 실행하기 위해서 초기 설정이 필요합니다. Yaml 파일을 아래 디렉토리에 생성합니다.

sudo vi /etc/prometheus/prometheus.yml

설정 파일은 아래와 같습니다.

global:
  scrape_interval: 15s
  evaluation_interval: 15s

rule_files:
  - "rules.yml"

alerting:
  alertmanagers:
    - static_configs:
        - targets:
            - "localhost:9093"

scrape_configs:
  - job_name: "prometheus"
    scrape_interval: 5s
    static_configs:
      - targets: [ "localhost:9090" ]
  - job_name: "bifrost_node"
    scrape_interval: 5s
    static_configs:
      - targets: [ "localhost:9615" ]
  - job_name: "node_exporter"
    scrape_interval: 5s
    static_configs:
      - targets: [ "localhost:9100" ]
  - job_name: "bifrost_relayer"
    scrape_interval: 5s
    static_configs:
      - targets: [ "localhost:8000" ]

Prometheus 실행

다음으로, Prometheus를 위한 Systemd 설정을 해야 합니다. 다음 디렉토리에 설정 파일을 생성합니다.

sudo vi /etc/systemd/system/prometheus.service

설정파일은 아래와 같습니다.

[Unit]
Description=Prometheus Monitoring
Wants=network-online.target
After=network-online.target

[Service]
Type=simple
ExecStart=/usr/local/bin/prometheus \
  --config.file /etc/prometheus/prometheus.yml \
  --storage.tsdb.path /var/lib/prometheus/ \
  --web.console.templates=/etc/prometheus/consoles \
  --web.console.libraries=/etc/prometheus/console_libraries
ExecReload=/bin/kill -HUP $MAINPID

[Install]
WantedBy=multi-user.target

이제 다음 명령어들을 통해 서비스를 시작합니다.

sudo systemctl daemon-reload
sudo systemctl enable prometheus
sudo systemctl start prometheus

모든 설정이 정상적으로 작동하는지 테스트하려면, 브라우저에서 YOUR_SERVER_IP_ADDRESS:9090에 접속합니다. Prometheus 대시보드가 나타난다면 정상적으로 설치된 것으로 간주합니다.

NodeExporter 실행

NodeExporter를 위한 Systemd 설정이 필요합니다. 다음 디렉터리에 설정 파일을 생성합니다.

sudo vi /etc/systemd/system/node_exporter.service

설정파일은 아래와 같습니다.

[Unit]
Description=Node Exporter
Wants=network-online.target
After=network-online.target

[Service] 
Type=simple
ExecStart=/usr/local/bin/node_exporter

[Install]
WantedBy=multi-user.target

이제 다음 명령어들을 통해 서비스를 시작합니다.

sudo systemctl enable node_exporter
sudo systemctl start node_exporter

AlertManager 실행

Alertmanager를 위한 Systemd 설정이 되어있어야 합니다. 아래 디렉토리에 설정 파일을 생성합니다.

sudo vi /etc/systemd/system/alertmanager.service

설정 파일은 아래와 같습니다.

[Unit]
Description=AlertManager Server Service
Wants=network-online.target
After=network-online.target

[Service]
Type=simple
ExecStart=/usr/local/bin/alertmanager \
--config.file /etc/alertmanager/alertmanager.yml \
--storage.path /var/lib/alertmanager \
--web.external-url=http://localhost:9093 \
--cluster.advertise-address='0.0.0.0:9093'

[Install]
WantedBy=multi-user.target

이제 다음 명령어들을 통해 서비스를 시작합니다.

sudo systemctl enable alertmanager
sudo systemctl start alertmanager

Grafana 설치

Prometheus 메트릭을 시각화하려면 Prometheus 서버에 쿼리하는 Grafana를 설치해야 합니다. 최신 릴리스는 다운로드 페이지에서 확인할 수 있습니다. 필요한 의존성을 설치하려면 다음 명령어를 실행합니다.

sudo apt-get install -y adduser libfontconfig1
wget https://dl.grafana.com/enterprise/release/grafana-enterprise_10.0.1_amd64.deb
sudo dpkg -i grafana-enterprise_10.0.1_amd64.deb

Grafana 실행

이제 다음 명령어들을 통해 서비스를 시작합니다.

sudo systemctl daemon-reload
sudo systemctl enable grafana-server
sudo systemctl start grafana-server

이제 YOUR_SERVER_IP_ADDRESS:3000/login으로 접속하여 Grafana에 접근할 수 있습니다. 기본 사용자 이름과 비밀번호는 admin/admin입니다.

Docker 사용

이 섹션은 Prometheus와 Grafana를 도커(docker)를 사용해 설치하고 셋업하는 방법을 안내합니다.

요구 사항

먼저 서버에 Docker와 Docker Compose를 설치해야 합니다. 그런 다음 바이프로스트 노드의 GitHub 저장소에서 제공하는 docker-compose.yml 파일을 다운로드 합니다. 아래 명령어를 사용하여 파일을 다운로드 합니다. 파일은 maintenance 디렉토리에 저장됩니다.

git clone https://github.com/bifrost-platform/bifrost-node.git
cd bifrost-node/maintenance

AlertManager 설정

경고 규칙은 maintenance/prometheus/rules.yml 파일에 미리 정의되어 있습니다. 이 파일에는 인스턴스가 다운되었거나 CPU 사용률이 80%를 초과할 경우 경고를 발생시키는 두 개의 기본 규칙이 포함되어 있습니다. 해당 파일은 아래와 같이 제공됩니다.

groups:
  - name: alert_rules
    rules:
      - alert: InstanceDown
        expr: up == 0
        for: 5m
        labels:
          severity: critical
        annotations:
          summary: "Instance $labels.instance down"
          description: "[{{ $labels.instance }}] of job [{{ $labels.job }}] has been down for more than 1 minute."

      - alert: HostHighCpuLoad
        expr: 100 - (avg by(instance)(rate(node_cpu_seconds_total{mode="idle"}[2m])) * 100) > 80
        for: 0m
        labels:
          severity: warning
        annotations:
          summary: Host high CPU load (instance bLd Kusama)
          description: "CPU load is > 80%\n  VALUE = {{ $value }}\n  LABELS: {{ $labels }}"

alertmanager.yml 파일은 경고가 발생했을 때 호출할 외부 서비스를 설정하는 데 사용됩니다. 여기에서는 Gmail 알림을 사용할 예정입니다.

Gmail 알림을 사용하려면 앱 비밀번호 (App Password)를 생성해야 합니다. 알림 전용 이메일 주소를 사용하는 것을 권장하며, 설정 방법은 이 링크를 참고 바랍니다.

해당 파일은 maintenance/alertmanager/alertmanager.yml 경로에 위치합니다. 이 파일에 Gmail 설정을 추가하고, 아래와 같이 저장합니다.

global:
  resolve_timeout: 1m

route:
  receiver: 'gmail-notifications'

receivers:
  - name: 'gmail-notifications'
    email_configs:
      - to: '' # receiver email
        from: '' # sender(monitoring system) gmail
        smarthost: 'smtp.gmail.com:587'
        auth_username: '' # sender(monitoring system) gmail
        auth_identity: '' # sender(monitoring system) gmail
        auth_password: '' # sender(monitoring system) gmail's app password <https://support.google.com/mail/answer/185833?hl=en>
        send_resolved: true
Example
global:
  resolve_timeout: 1m

route:
  receiver: 'gmail-notifications'

receivers:
  - name: 'gmail-notifications'
    email_configs:
      - to: '[email protected]'
        from: '[email protected]'
        smarthost: 'smtp.gmail.com:587'
        auth_username: '[email protected]'
        auth_identity: '[email protected]'
        auth_password: 'my-auth-password'
        send_resolved: true

Prometheus 설정

Prometheus를 시작하려면 일부 설정이 필요합니다. 설정 파일은maintenance/prometheus/prometheus.yml 경로에 위치해 있습니다.

노드와 릴레이어를 모두 운영하는 풀 노드 운영자 (Full-Node operator)는 아래에 있는 "relayer" 작업 (job)을 수동으로 주석 해제하고 파일 저장합니다.

global:
  scrape_interval: 3s
  evaluation_interval: 3s

rule_files:
  - "rules.yml"

alerting:
  alertmanagers:
    - static_configs:
        - targets:
            - "alertmanager:9093"

scrape_configs:
  - job_name: "prometheus"
    scrape_interval: 3s
    static_configs:
      - targets: ["localhost:9090"]
  - job_name: "bifrost_node"
    scrape_interval: 3s
    static_configs:
      - targets: ["host.docker.internal:9615"]
  - job_name: "node_exporter"
    scrape_interval: 3s
    static_configs:
      - targets: ["node-exporter:9100"]
  # - job_name: "bifrost_relayer"
  #   scrape_interval: 3s
  #   static_configs:
  #     - targets: ["host.docker.internal:8000"]

도커 컨테이너 실행

위의 모든 과정을 완료했다면, maintenance 디렉터리로 이동한 후 다음 명령어를 실행합니다.

docker compose up -d

이제 브라우저에서 YOUR_SERVER_IP_ADDRESS:3000/login으로 접속할 수 있습니다. 기본 사용자명과 비밀번호는 admin / admin입니다.

데이터소스 설정

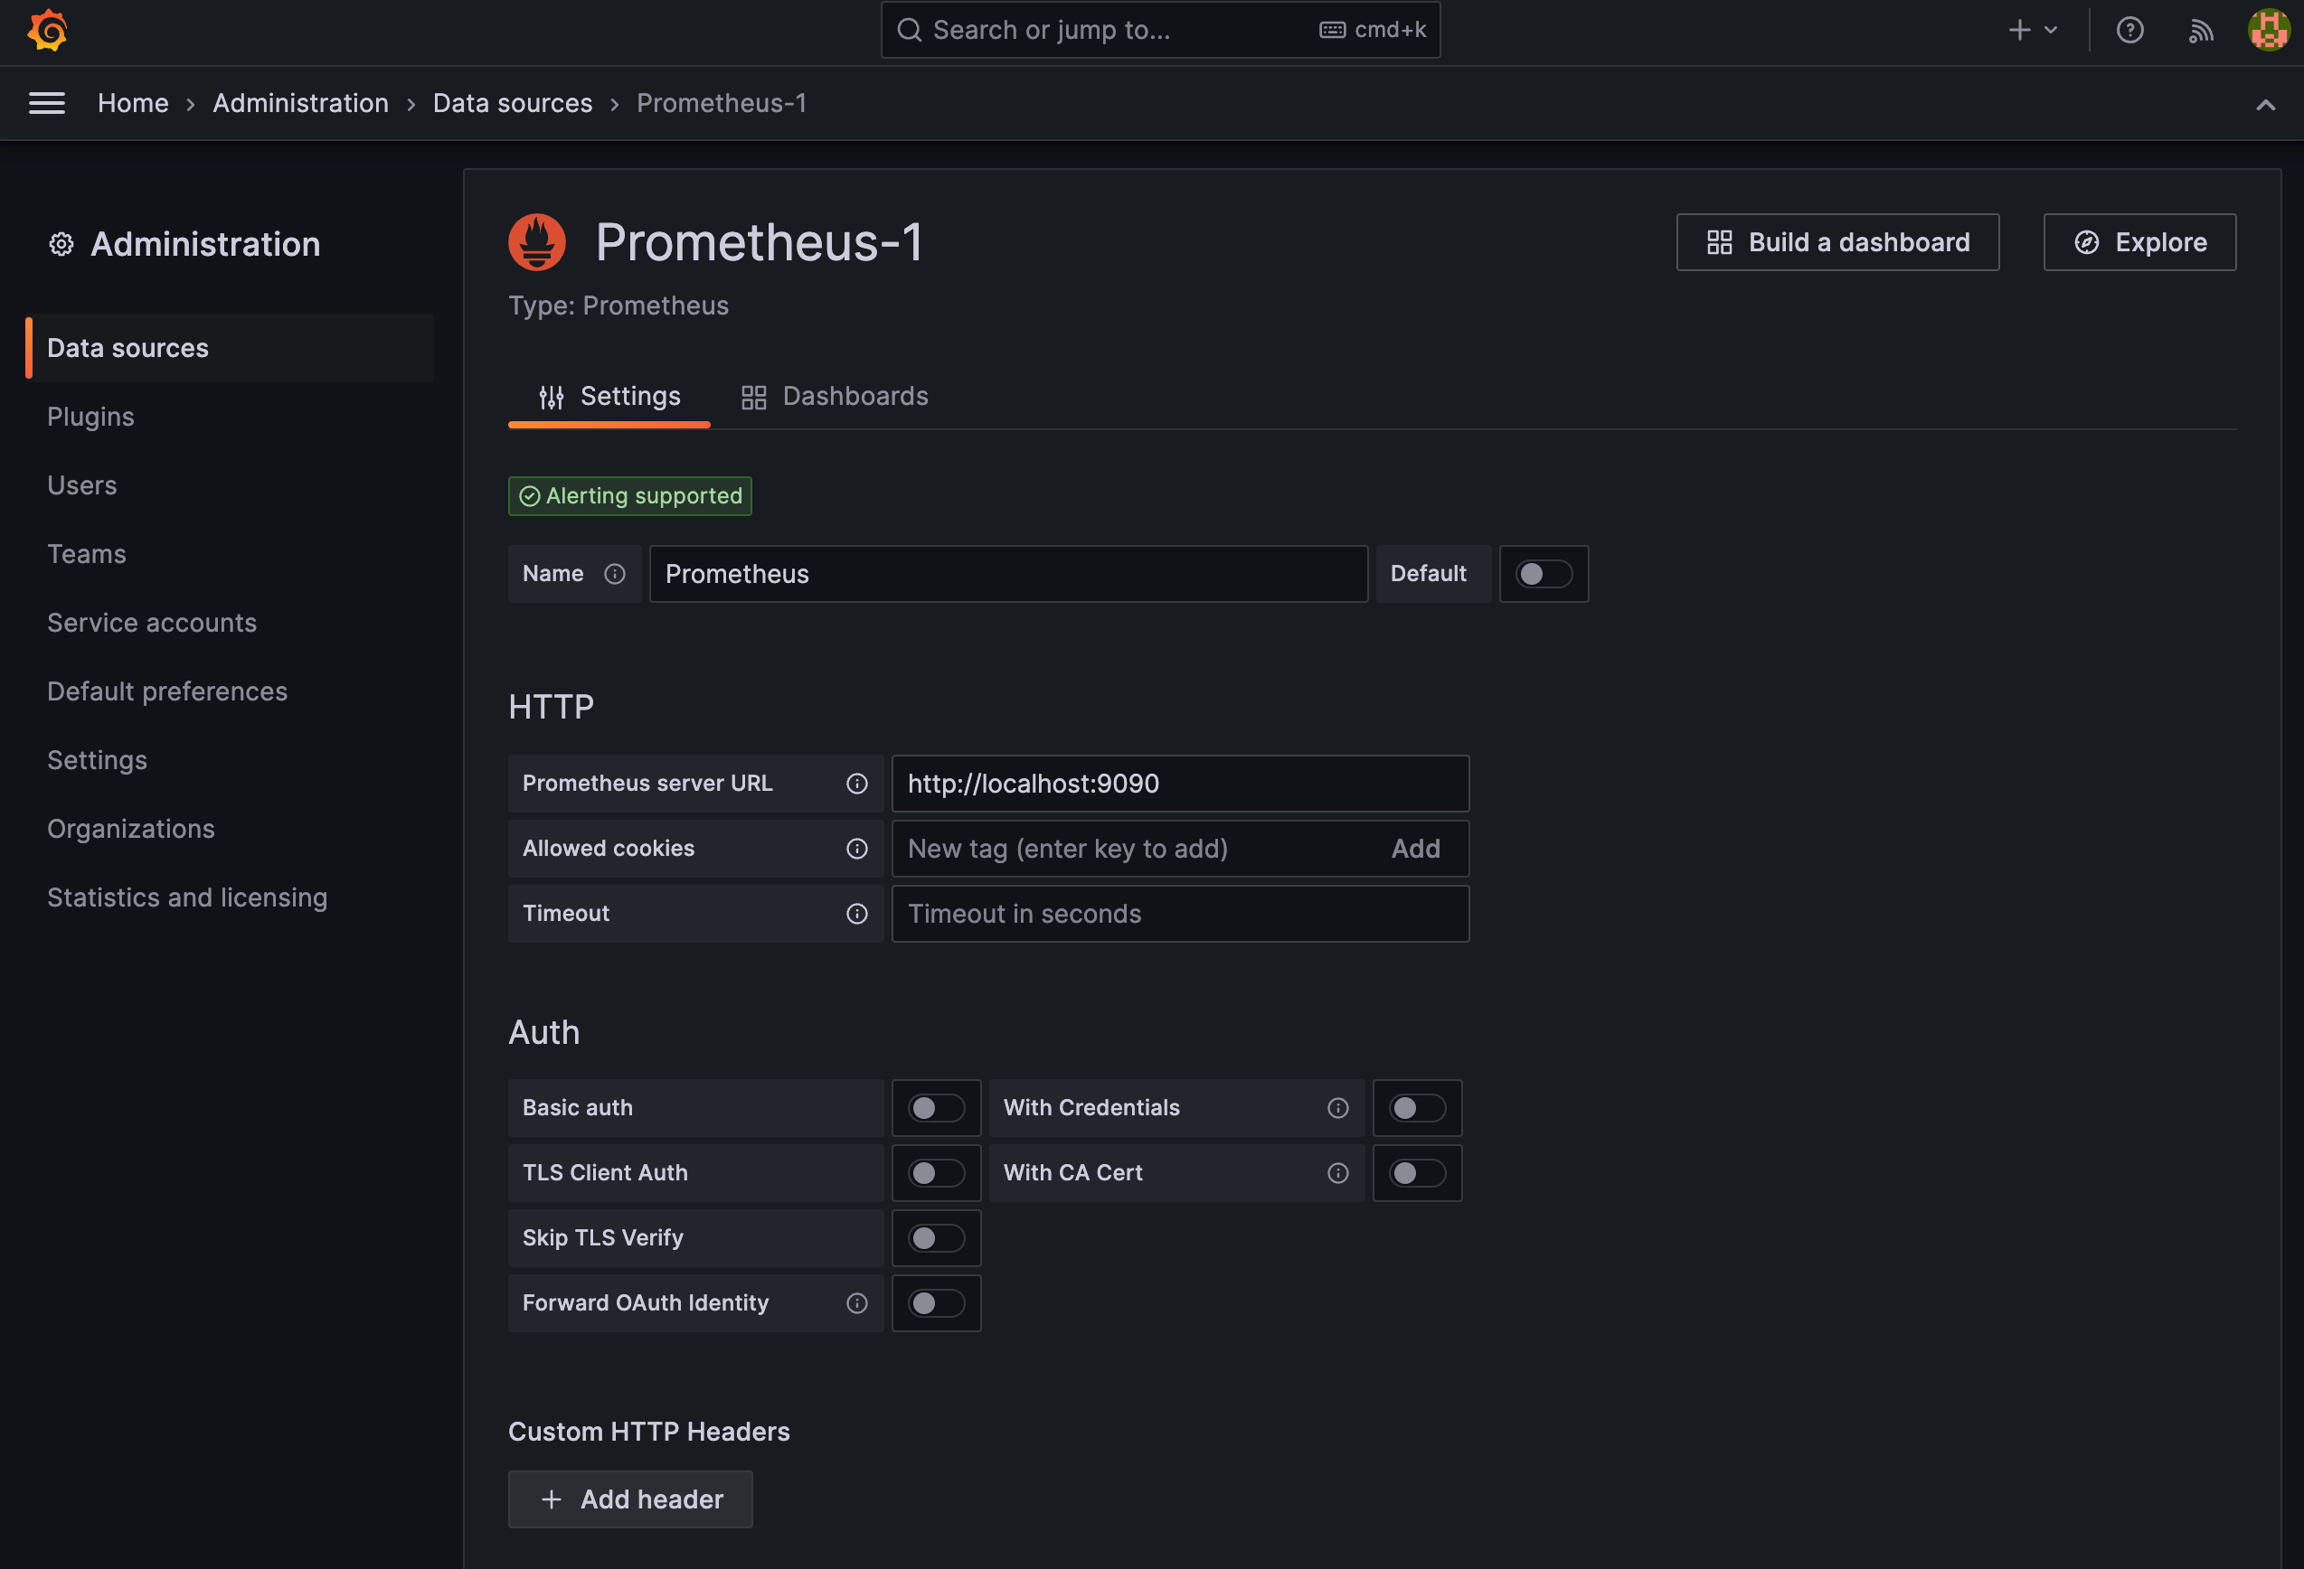
설정이 완료되면, 새로운 Prometheus 데이터 소스를 생성하고 URL에 http://localhost:9090을 입력한 후 아래와 같이 "Save & Test"를 클릭합니다.

도커 유저들은 URL을 다음과 같이 셋업 해야합니다.http://prometheus:9090
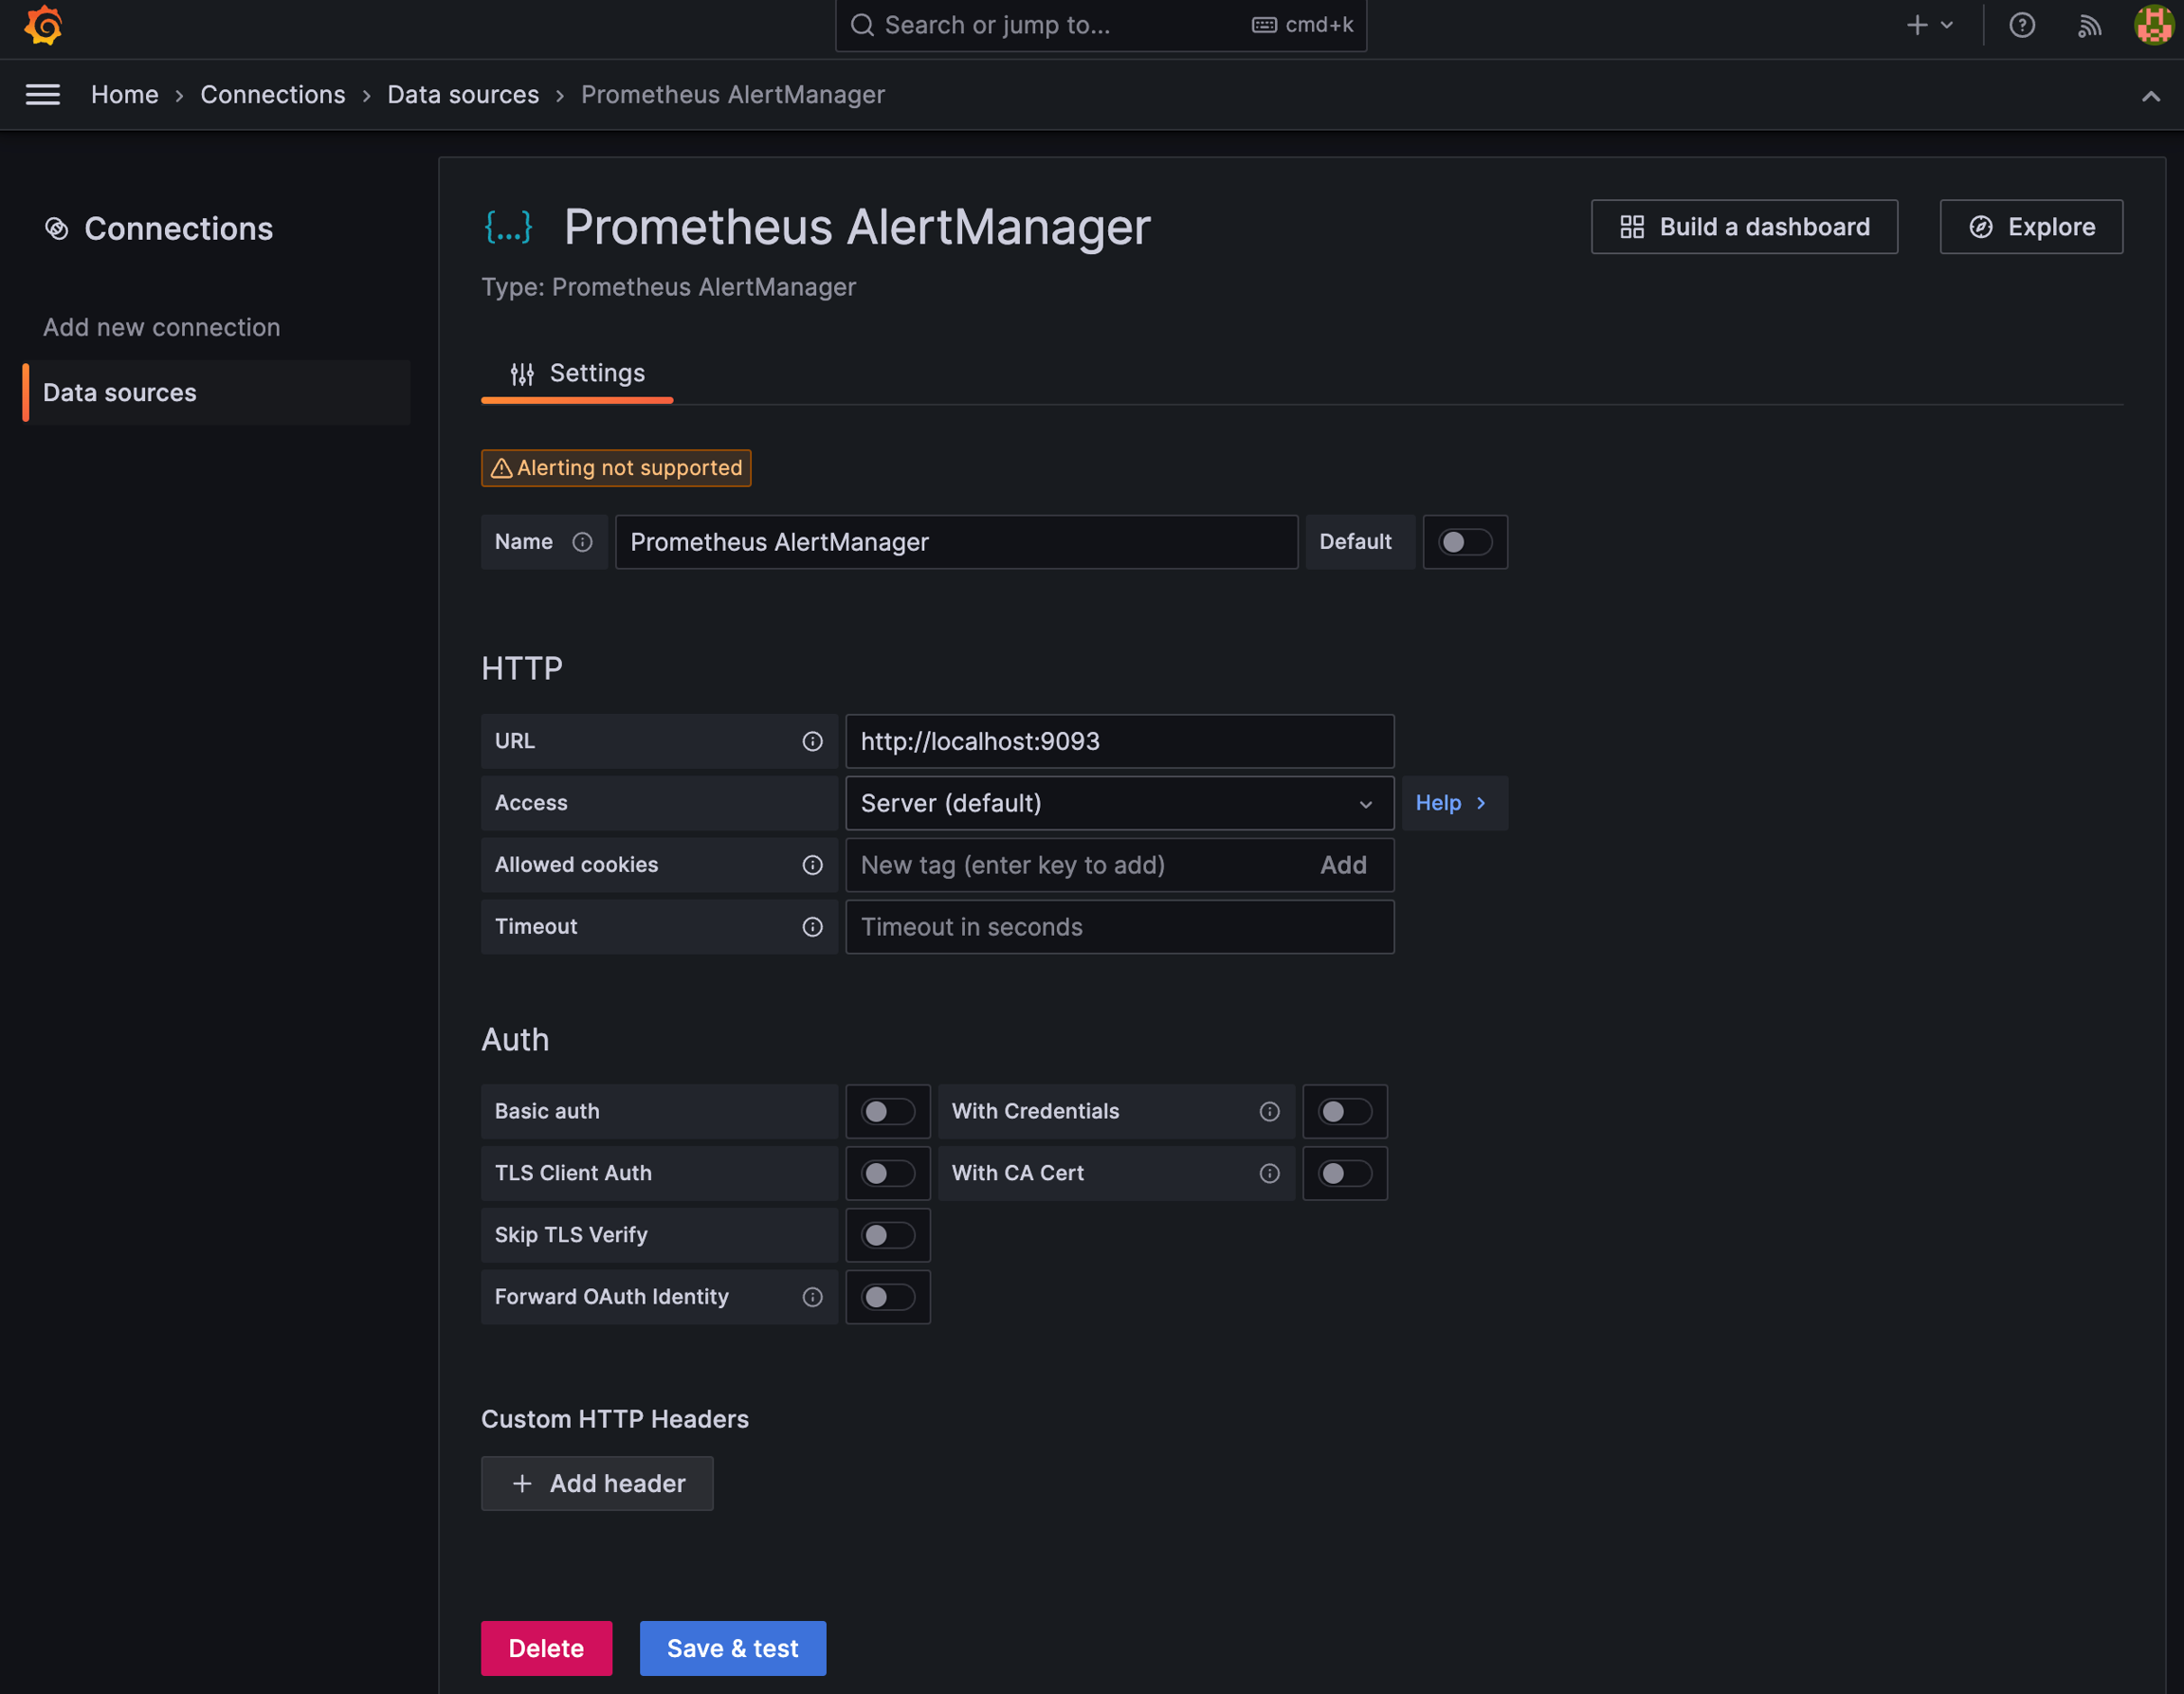
그런 다음, 새로운 Prometheus AlertManager 데이터 소스를 생성하고 URL에 http://localhost:9093을 입력한 뒤 아래와 같이 "Save & Test"를 클릭합니다.

만약 도커를 사용하는 경우, URL은 http://alertmanager:9093으로 설정해야 합니다.
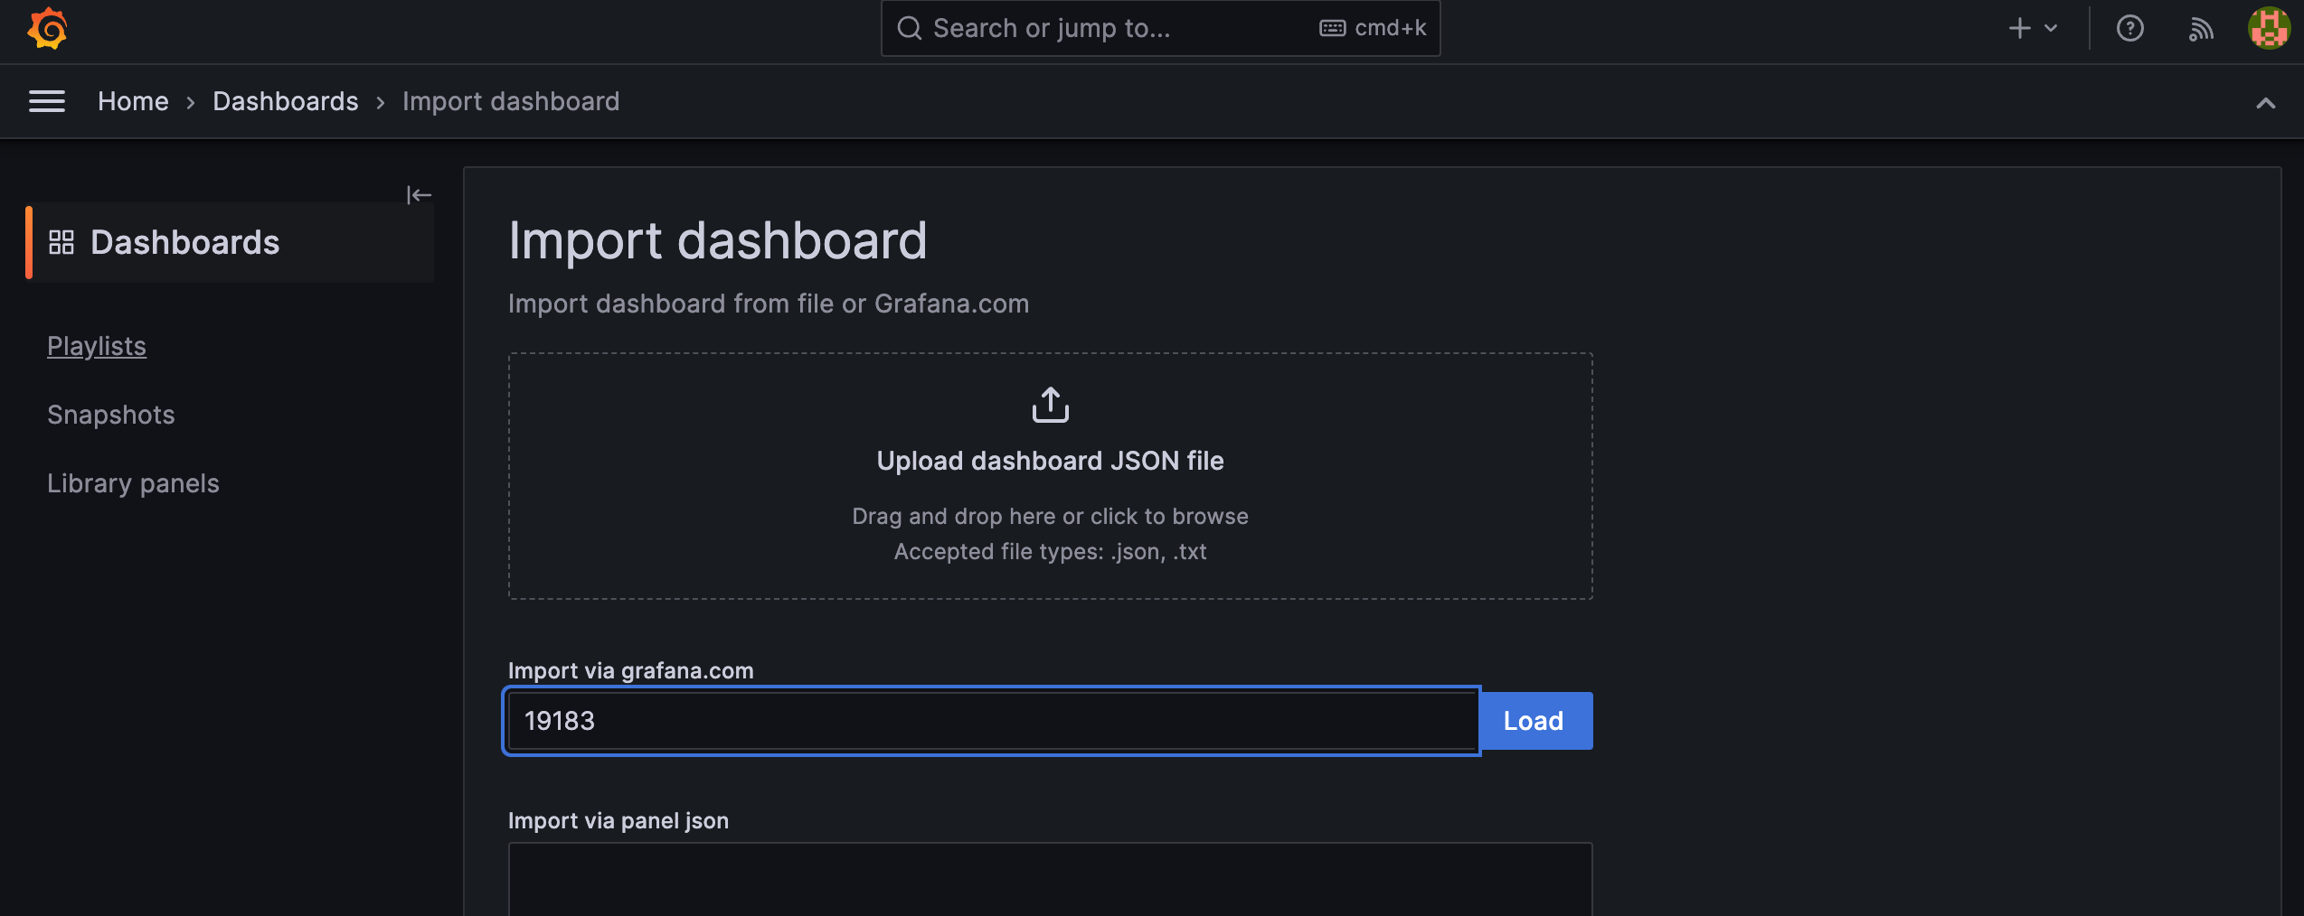
다음으로, 대시보드를 가져와야 합니다. "Dashboards" 탭에 접속한 후, 아래와 같이 "New"를 클릭하여 대시보드를 불러옵니다.

이제 "Import via grafana.com" 섹션에서 대시보드 ID에 19207을 입력한 후 "Load"를 클릭하여 계속 진행합니다.
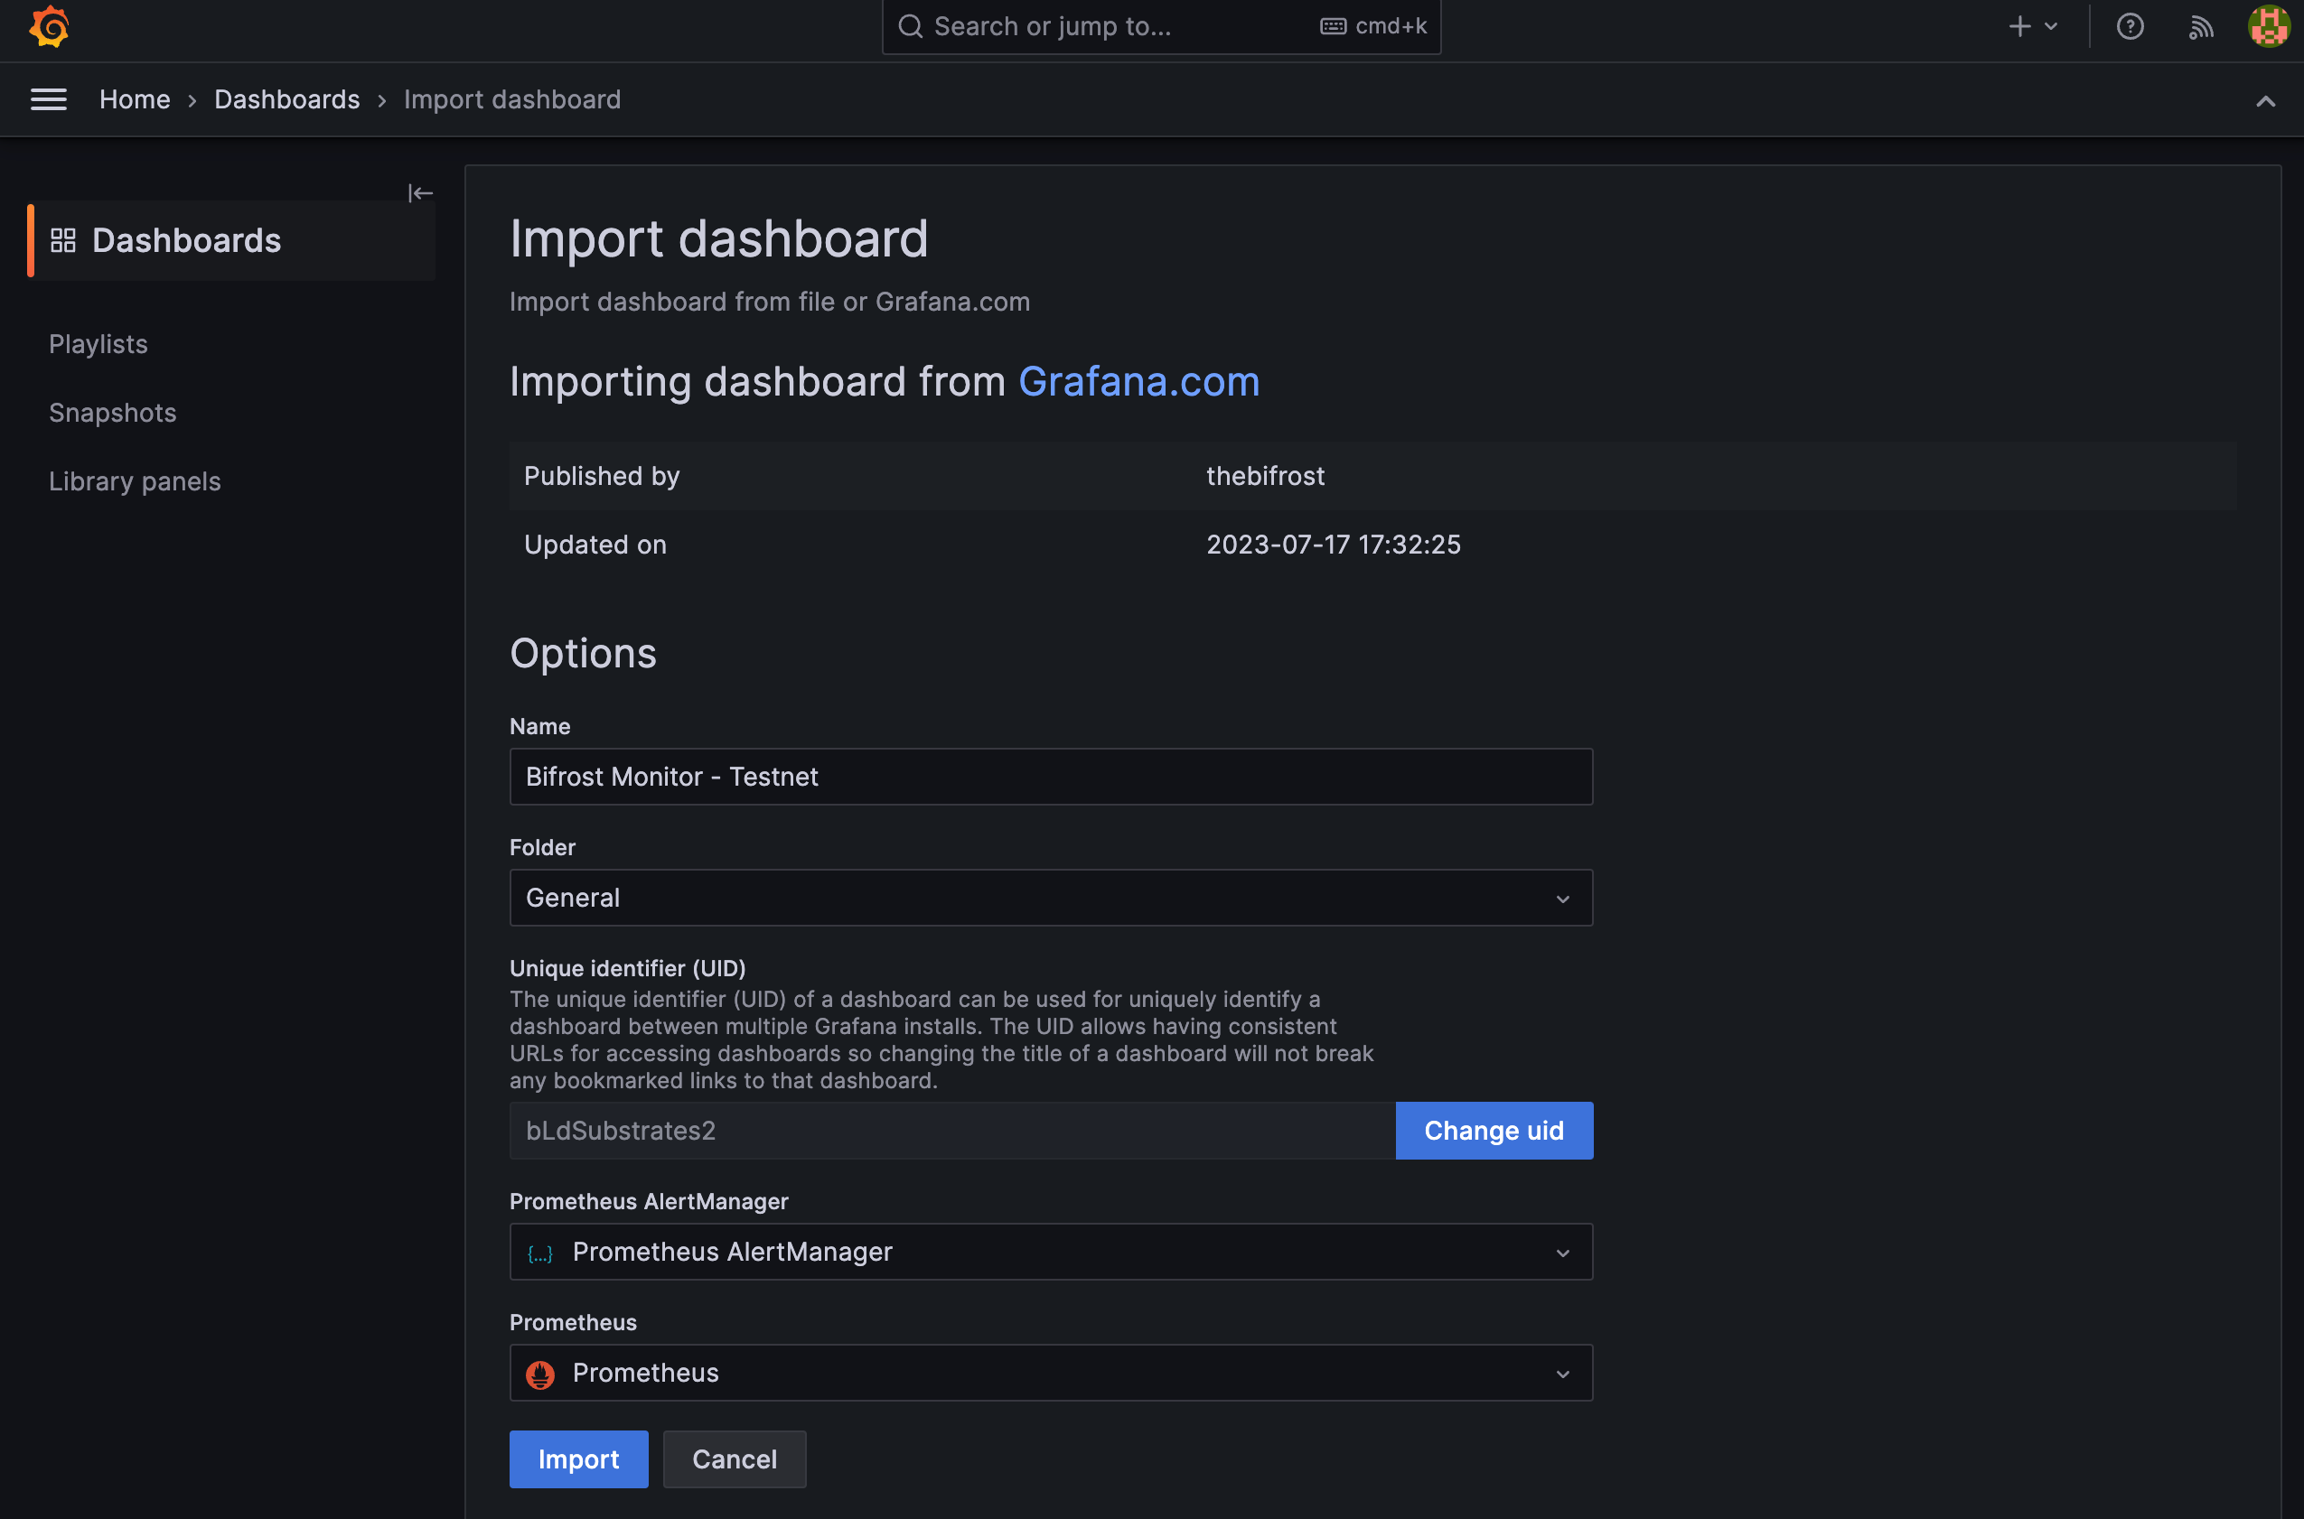
정상적으로 불러와졌다면, 이전에 생성한 데이터 소스를 올바르게 설정해야 합니다. Prometheus와 AlertManager가 올바르게 연결되었는지 확인한 뒤, "Import"를 클릭하여 완료합니다.
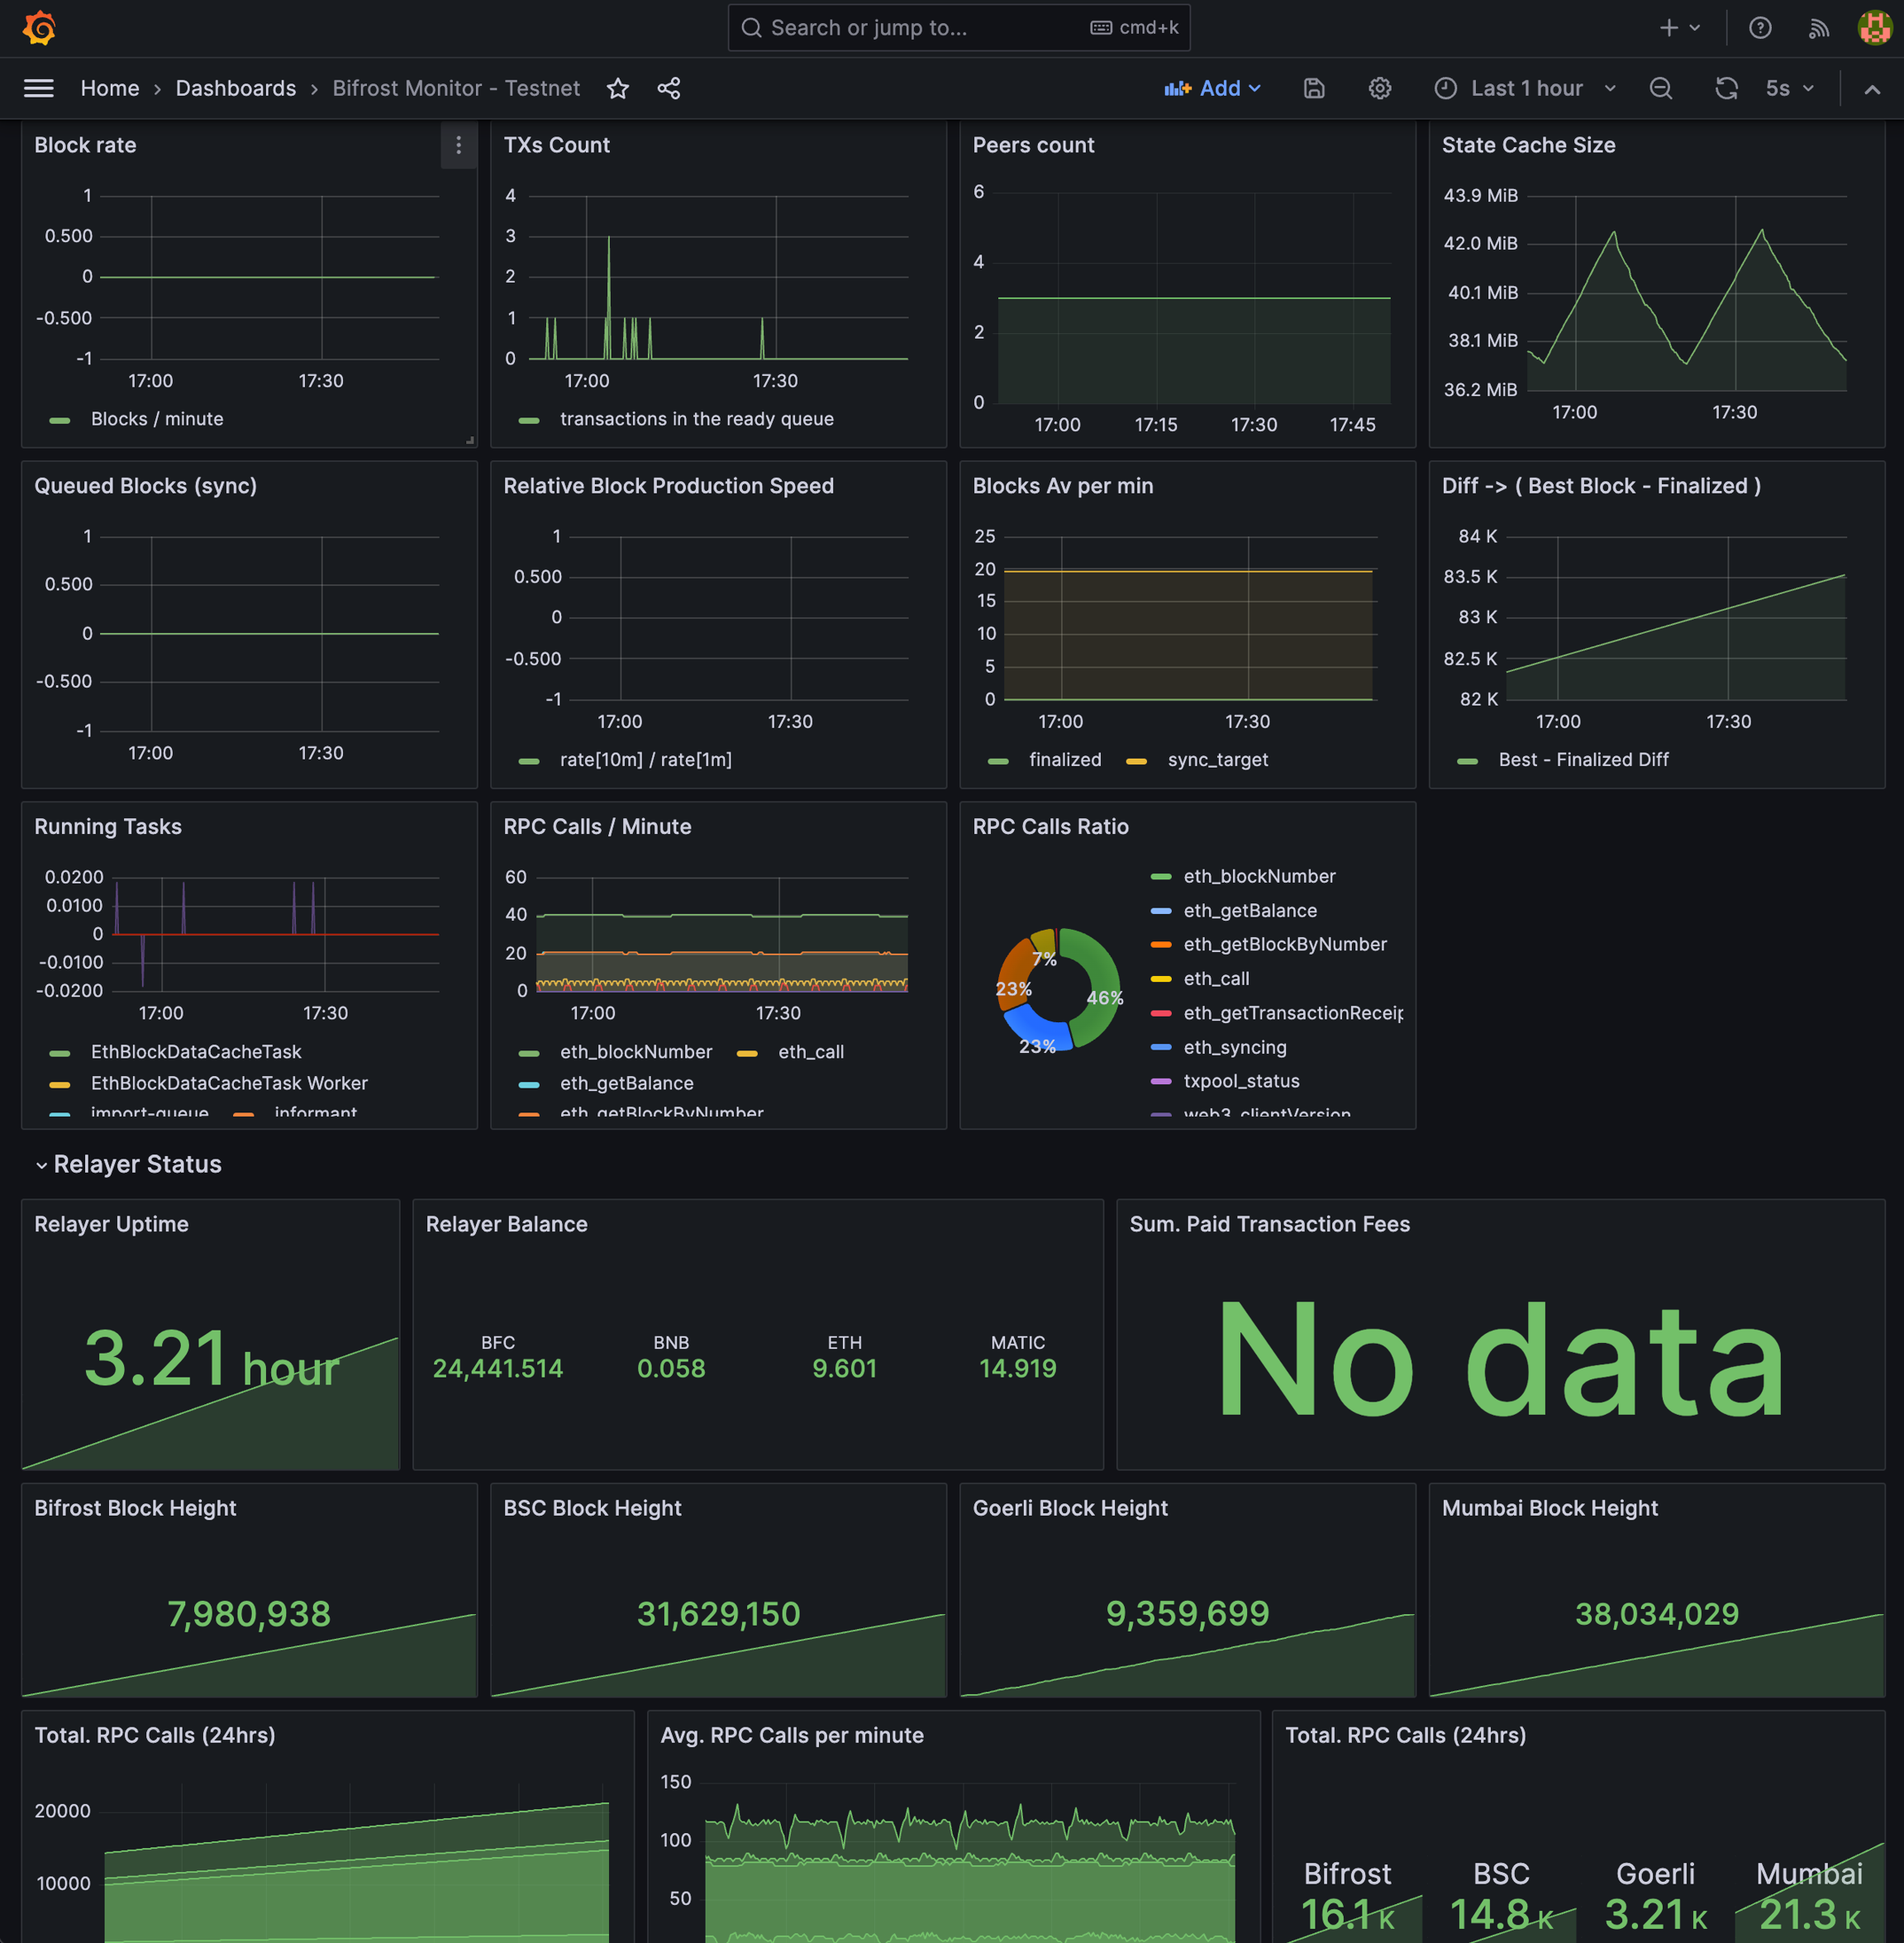
이와 동시에, 노드와 릴레이어가 백그라운드에서 실행 중이라면, 수집된 메트릭이 아래와 같이 시각화됩니다.
Last updated